Financial chargebacks
The Financial Chargebacks feature will allow you to charge certain work order transactions to the appropriate department in order to help recover costs of repairing and maintaining your assets. Asset Essentials makes it quick and easy for you to reclassify your chargeable transactions through the new work order form, or the bulk update feature on the Chargebacks summary page. When you reclassify your chargeable transactions, you can select a specific cost center that is tied to the appropriate department that needs to be charged. *Note: The feature below is only available to clients who have purchased Core Plus or Asset Essentials Enterprise. Please contact your Sales Representative or Client Services if you are interested in purchasing Core Plus or Asset Essentials Enterprise. If you are eligible for this feature, contact Client Services to enable it for you.
Configuring permissions for chargebacks
In order to view chargebacks, the permission must be enabled for the appropriate user role. You must be a Global Administrator to configure this permission. It is also important to note that the system setting options, "Cannot Edit Saved Labor Transactions" and "Return only for dispatched parts", will be activated and locked down as a result of having this feature enabled in your account. *Note: Configuring this permission for a user role will assign that permission to each user that is in that role. You can manage any individual user's account to remove the permission, if necessary.
- Click the Admin menu icon, then select Roles.
- Select any user role from the list with the user type of Administrator or Full User.
- Check the boxes next to Chargebacks at each level that is necessary for that user role.
- Click Save.

Reclassifying chargebacks on a work order
This capability empowers maintenance teams to save time and simply recover costs on work done for other departments through simple expense reclassification on work orders, ensuring each department pays their fair share in maintaining a facility. For example, your Athletics department needs help to set up the gym for a basketball game. They contact the Maintenance department to help complete that task. Once the work is complete, the Maintenance department could charge Athletics for the labor hours that it took to set up the gym. They can document this on the work order in Asset Essentials.
- Click on the Work Orders menu icon, then select Work Orders.
- Click on the title of the work order you need to reclassify chargeable transactions for.
- Click the Reclassify button next to a chargeable transaction in the Labor, Parts, Purchases, or Equipment Usage section.
- In the window that appears, select the cost center that should be charged in the Charge To drop-down menu.
- Click Save. You will now see your selection in the Cost Center column on that transaction.

Managing chargebacks from the list view
Sorting and filtering the list of work order transactions will help you to easily export the appropriate transactions from the list for easy consumption. You can also reclassify transactions in bulk and split labor transactions using tools in the Actions column on this list.
-
Click on the Admin menu icon, then select Chargebacks.
Sorting
- To sort the list in ascending or descending order, click any of the column headers except Cost Type or Amount. An arrow will appear next to the column header to indicate the order it is currently sorted in.

Filtering
Using the column filters
- To narrow down the list of transactions, enter in a work order number, work order title, or work category under the respective column header.
- You can also narrow down the list of transactions by clicking the triangle icon (
 ) under the Cost Type or Exported header.
 - Check the box(es) next to the options you want to sort the list by.

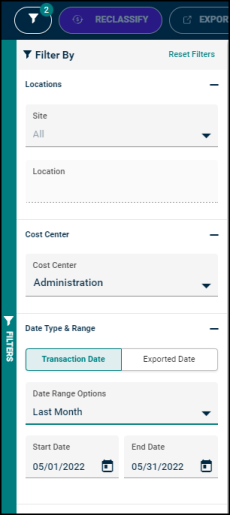
Using the filter panel
- Click either the Open Filters side bar or the filter button (
 ) at the top of the screen to open the filter panel.
 - In the Locations section, you can select a Site from the drop-down menu. The Location drop-down menu will then populate with only the locations tied to that site.
- Select a Location from the drop-down menu.
- In the Cost Center section, you can select a Cost Center from the drop-down menu.
- In the Date Type & Range section, you can choose to filter by Transaction Date or Exported Date.
- Select an option from the Date Range Options drop-down menu.
- Click the calendar icon in the Start Date and End Date fields to select the desired date range.
- To clear the filters, click Reset Filters in the top right corner of the panel.
Reclassifying transactions in bulk
- Check the box(es) next to the transactions you need to reclassify. If you need to reclassify the whole list, check the box in the top left corner to select all transactions.
- Click the Reclassify button at the top of the list.
- In the window that appears, select the cost center that should be charged in the Charge To drop-down menu.
- Click Save. You will now see your selection in the Cost Center column for those transactions.
Splitting labor transactions
The split labor transactions feature will allow you to split a labor transaction between multiple cost centers. For example, if a basketball game setup occurred during normal business hours, those labor costs may be charged to the Maintenance department. If the event breakdown occurred outside of normal business hours, those labor costs may be charged to the Athletics department. *Note: You are not able to split a labor transaction that has already been split.
- Click the triangle icon ( ) under the Cost Type header.
- Check the box next to Labor.
- Click the three dots in the Actions column and select Split Transaction.
- In the window that displays, select the Cost Centers that you need to split the transaction across using the drop-down menus. *Note: The maximum number of cost centers you can split a labor transaction between is three.
- If you need to split the cost equally, click Split Equally above the Amount fields.
- If you don't need to split the cost equally, manually enter each amount in the Amount in Cost Center fields for each cost center.
- Make sure the Amount Remaining field is at zero in order to be sure you accounted for all of the labor costs.
- Click Split Transaction to save your changes.
Exporting
You can only export a transaction one time in its current state. If the transaction changes over time, you are able to re-export the transaction representing that change.
- Check the box(es) next to the transactions you need to export. If you need to export the whole list, check the box in the top left corner to select all transactions.
- Click the Export button at the top of the list.
- The CSV file will begin downloading to your local computer drive.
